Tuesday, 11 December 2012

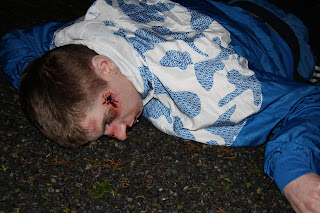
Basic Special Effects Makeup (Beaten up dead body)


All you need:
1. Very light foundation
2. Some grease paints (red,blue,yellow,black & various shades of brown)
3. Green & Grey eyeshadow
4. Translucent powder
5. Tuplast (or mortician wax)
6.  FX blood
7. Cotton buds
8. Stipple sponge

To begin I added a green and grey eyeshadow to the lightest liquid foundation that I had, mixing well. I then applied this to the face and neck with a foundation brush and powdered to seal. I took a little of the blue, red and yellow into the dish. I put a little of the yellow at the corner at the eye and blended out and brought it up slightly at the inner corner of the eye. Powder to seal, I did the same with the red and sealed again with the translucent powder. I did the same with a little of blue on the bony areas of the socket and made it darker with a smaller brush. On the opposite side a put a little bruise in the same sequence as before only less. For the broken nose, apply spirit gum pat to make tacky and then apply tuplast in two thin lines across the bridge of the nose (make sure there is a small space between the two lines), have it more to one side and blend the edges out. Paint a black line in the middle of the tuplast lines, this will add depth. Paint a little red inside and bring up the sides. Add little of FX blood to the gap. Brush a light brown eyeshadow, (brown grease paint or bronzer) from where the soft part of your nose stops up towards the start of the brow on one side of the nose, on the other side of the nose starting in the same place brush the eyeshadow up but curve it towards the other line but don’t join the lines. This will give the illusion of a broken nose. Apply black to the inside of one nostril, then a reddish colour then apply FX blood dripping it down towards the lip.


You can have a lot of fun with this makeup. Don't worry about doing it perfect because it won't look realistic if the cuts and bruises look too tidy.

Hope you have fun re creating this look.

Ais 
x
Tuesday, 4 December 2012

The Timeless Flick

This makeup is timeless, suits most women and almost every season.


I found that using an eyeliner brush & gel eyeliner is the easiest way to create this look but that's just me, others find using a kohl eyeliner an easier way. 
  1. Apply foundation, concealer as normal, powder to finish.
  2. Dip the brush into the gel (turn gel pot upside down to stop it from drying out), wipe excess on the back of your hand and apply from the inner corner of the eye outwards. The line can be as thick or as thin as you like.
  3. Curl eyelashes.
  4. Now there is two easy ways to create the flick
(a) From the outer corner of your lower lash line angle the brush upwards and draw the line. Connect the two lines together. When doing a flick in this way it comes out more dramatic. In the crease of the eye (only) apply a light peach or pink, using an angled brush apply a little of the peach or pink to the lower lash line and blend well at the outer corner. Apply mascara as normal.
(b)The second way to do the flick is to place a little sellotape (angled and be careful not to place it in your brows and it has to be about 2mm away from the outer corner of your eye) at the corner of your eye. Apply the liner from the inner corner of the eye to the outer corner and bring into an upward stroke. Remove the sellotape and you now have a lovely sharp flick. Apply mascara to the top lashes only.


     5.Apply a light coloured blusher just to the apple of the cheeks (a happy big smile will help you find them).
     6.A light coloured lipstick and lip liner is the best suited to this look as the eyes' should be the main focus point.
Hope you enjoy re-creating this look and making it your own!! My inspiration for this look was Adele's song 'Rumour Has It' love the vibe that, that songs creates for me and she looks amazeballs in the video.

Ais

x


Bloglovin

<a href="http://www.bloglovin.com/blog/4336289/?claim=dndy8nagj6a">Follow my blog with Bloglovin</a>

My Interpretation of a Modern Geisha!

So I'm going to start this post with some interesting information about where and how the 'Geisha' originated. Well I think it's interesting you may disagree with me.

Geisha are traditional Japanese female entertainers who act as hostesses and whose skills include performing various Japanese arts such as classical music, dance and games.
In the early stages of Japanese history, there were female entertainers: saburuko (serving girls) were mostly wandering girls whose families were displaced from struggles in the late 600s. Some of these saburuko girls sold sexual services, while others with a better education made a living by entertaining at high-class social gatherings. After the imperial court moved the capital to Kyoto in 794 the conditions that would form Japanese Geisha culture began to emerge, as it became the home of a beauty-obsessed elite, Skilled female performers, such as shirabyoshi dancers, thrived.

Below is my interpretation of a Geisha. My inspiration was the simple Cherry Blossom. This a great look for fancy dress parties and Halloween.The reason why I love this look is because you can make it completely your own.

To create this look this is what you will need;
1. Clown paint or Aqua based Body & Face paint. These can be bought online or any joke shop/costume shop.
2.Bright Pink pigment and Vaseline
3.Black gel or liquid eyeliner, whatever your more comfortable with. 
4. Translucent Powder.
5.Funky Fake Eyelashes. Can be bought online or any joke shop/costume shop.
6.Eyeliner brush x2, Foundation brush, Blending brush, Angled brush, sponges, cotton buds and a powder brush.

*To start make sure face is freshly cleansed and moisturised. Apply the clown paint to the entire face and ears. Make sure not to have any lines from the brush, use the sponge to buff away the lines. Dust with some translucent powder to set.
*To the eyelid apply the pink pigment bringing around the eye socket. You may have to repeat this a couple of times to get the intense colour that you want.
*Apply the black gel liner to the upper lash line and bring out with an exaggerated flick. Add as many swirls as you like. Apply the pink to the end of each swirl with a cotton bud (this creates a cherry blossom look) and repeat on the other eye. With the angled brush apply the black gel liner to the brows ( you can use the natural browshape or create a straight line browshape).
*Apply the fake lashes.
*To finish create a heart shape on the lips with a little of the pigment mixed with some Vaseline. Apply with cotton buds and a lip liner brush. 


A basic and easy way to re-create the Geisha Makeup. 
For the hair a back combing brush, some girby grips and a can of hairspray are your best friends. :)

Hope you enjoyed my first blog entry and if you have any questions please ask away!

Ais 
x